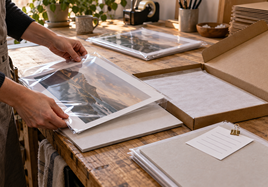


To reorder Retail Ready Prints consistently, use the same approved file and repeat every print and packaging choice from the last approved order. Save the image size, crop, paper, border or margin, backing board, clear bag, quantity, and one physical reference print. Order a new proof only when one of those details changes.
At Stackhouse, Retail Ready Prints are paper prints packaged with a backing board and clear protective bag. A reliable reorder needs to match the print and the package. Saving only the artwork file is not enough.
Retail Ready Print Reorder Checklist
Keep these details together in one order note:
| Save | What to record |
|---|---|
| Approved file | Exact file name and version |
| Image setup | Image size, crop, orientation, and border or margin |
| Print surface | Exact paper or media choice |
| Package | Retail Ready backing board and clear bag |
| Order | Quantity, order date, and any production note |
| Reference | One clean approved print from the accepted batch |
A short, complete record is easier to use than a folder full of old messages. Keep it with the approved file so the next order starts from the same facts.
Lock the Approved File for Retail Ready Prints
Start with the exact file that produced the approved print. Give it one clear name and move earlier versions into a separate folder. Names like final, final-two, and new-final make a quick reorder harder than it needs to be.
Open the file before uploading it again. Confirm the pixel dimensions, color profile, orientation, crop, and any built-in margin. Don't trust the thumbnail alone. A small unrecorded edit can create a different print.
Use the file prep guide if resolution, color profile, or crop needs another check before you place the order.
Save the Print and Packaging Specs
Record the selected image size, final outside size, paper, crop, border or margin, quantity, and Retail Ready package. The backing board and clear bag are part of the finished product, so they belong in the reorder note too.
Also save anything that happens before packaging. If you sign, number, add a certificate, or include a branded insert, note when and where that step happens. The next batch should follow the same handoff plan.
Treat the print specs and package specs as one finished product recipe. A matching image on the wrong paper is not an exact reorder. The right print inside a different package is not an exact reorder either. Both parts shape what the buyer receives.
If you are still choosing between packaged and loose prints, use the Retail Ready vs. Loose Prints guide first. This reorder checklist assumes the Retail Ready package is already the approved choice.
Keep One Approved Reference Print
Store one clean approved print away from display copies and sellable stock. Mark it as the reference so it doesn't leave the studio by mistake. A physical print helps you compare paper tone, crop, color relationships, shadow detail, and overall feel.
Keep a photo of the finished package with the order note too. The photo can show how the print sits against the backing board, how the bag closes, and where any label or insert belongs. The physical print remains the better color reference.
Check the reference under useful, repeatable light. Soft daylight or the same neutral studio light works better than a dark room or a strong yellow lamp. If the reference is still inside its bag, watch for glare before judging color or shadow detail.
Check What Changed Before Reordering
Ask one question before placing the next order: did anything change? Check the artwork file, image size, crop, paper, border or margin, quantity, and package. If every answer is no, repeat the saved recipe.
If one detail changed, name it in the order note. A larger image size may expose soft detail. A new crop may move a signature. A different paper may shift pale color. A new outside size may change how the board and bag fit.
Order a New Proof Only When the Setup Changes
You don't need a new proof for every exact reorder. A new proof becomes useful when the file, size, crop, paper, border, color decision, or finished package changes.
Give the proof one clear job. Compare the changed detail with the approved reference and decide whether it works. Avoid making several unrecorded changes at the same time. That makes it hard to know which choice caused the difference.
Review the New Batch Before It Becomes Inventory
When the reorder arrives, compare one clean print with the approved reference before the batch is sold, shipped, or placed in a market bin. Check the whole image first. Then check paper tone, crop, border or margin, shadows, highlights, and fine detail.
Review the finished package too. Make sure the backing board supports the print, the clear bag is clean, and the print sits the way you approved. If something feels different, write down the exact difference before changing the file.
Keep the Reorder Handoff Simple
If another person places or receives the order, give them the same file name, recipe, reference-print location, and review checklist. They should not need to search old email or make a new choice while the order is moving.
Ask them to record any change before checkout. When the batch arrives, use the same review order every time: artwork, paper, crop, package, then quantity. A steady handoff makes a repeat order easier to check and easier to fix when something truly changed.
Keep Edition Notes Separate From the Reorder Recipe
The print recipe explains how to repeat the physical result. Edition records explain how many prints exist and how they are signed or numbered. Keep both records clear, but don't mix them into one vague note.
For a limited edition, keep the edition count and signing plan with the sales record. For an open edition, keep the reorder date and any intentional production change. The reorder checklist still uses the same approved file and physical reference.
Final Takeaway
Reorder Retail Ready Prints from one approved file, one complete print-and-package recipe, and one clean reference print. Record any intentional change, then compare the new batch before it becomes sellable inventory.
FAQ
What should I save before reordering Retail Ready Prints?
Save the approved file name, image size, crop, paper, border or margin, backing board and bag choice, quantity, and one approved reference print.
Do I need a new proof for every Retail Ready Print reorder?
Not when the file and every print and packaging specification stay the same. Order a new proof when the file, size, crop, paper, border, color, or package changes.
What should I check when the reordered prints arrive?
Compare one clean print with the approved reference. Check the image, paper, crop, border, backing board, clear bag, and finished package before the batch becomes sellable inventory.