

Guide to Border Options & Print Sizes
Most print mistakes are not color problems. They are size, border, and cropping problems.
Choosing the right image size and border is about more than measurements. It affects how your artwork is cropped, how it fits into frames, and how it feels once it’s on the wall.
TL;DR: On The Stackhouse, you choose an image size first. Cropping happens at this step if needed. Borders are added outside the image and increase the final paper size. When in doubt, add a border for framing and flexibility.
If you’re ordering prints today, start on our giclee fine art prints page and choose your image size and border there.
Image size vs final size (how The Stackhouse works)
On The Stackhouse, there are two sizes that matter:
- Image size: The size of the artwork itself after you set your crop. This is the printed image area.
- Final size: The total paper size after any border is added.
If you choose a border, we add that white space outside your image size, which increases the final size.
- Borderless: Final size = image size
- With border: Final size = image size + border added to all sides
This matters most when framing or ordering prints to fit existing mats or frames.
Aspect ratio (the most common source of confusion)
Aspect ratio is the relationship between width and height. If your image’s aspect ratio does not match the image size you choose, cropping will occur.
- 2:3 – Common for DSLR cameras (4×6, 8×12, 12×18)
- 4:5 – Common for frames and portraits (8×10, 16×20)
- 1:1 – Square images
- ISO / A-sizes – A2, A3, A4 (international standards)
If you want to avoid cropping entirely, choose an image size that matches your file’s native aspect ratio.
How cropping actually works
Cropping is not an error. It happens automatically when your image and chosen image size do not share the same aspect ratio.
- Cropping removes content from the edges, not the center
- The crop preview shows exactly what the printed image area will be
- Borders are added after cropping and do not change what gets cropped
Cropping typically removes content from the edges, and you can reposition the crop in the preview. If preserving the full image is important, always review the crop preview before ordering.
Understanding border options
Borders add white space around the outside of your image. They do not shrink your image. They increase the final paper size.

- Borderless: No added white space. Final size matches the image size.
- ¼-inch border: Adds a subtle edge around the image.
- 1-inch border: Ideal for framing and handling.
- 2-inch border: Best for signing, matting flexibility, and larger prints.
Borders are added after you choose your image size and crop, so you always control the artwork dimensions first.
Final size formula: final width = image width + (2 × border), final height = image height + (2 × border)
Example: 8×10 image + 1" border → (8+2) × (10+2) = 10×12 final
When you should add a border
- You plan to frame the print
- You want flexibility with mats
- You plan to sign the artwork
- You want breathing room around the image
If you already own a frame, measure the opening, not the outer frame size.
Choose your image size to match the frame or mat opening, then add a border if you want additional white space.
Choosing the right image size
Image size decisions are closely tied to your paper or canvas choice and the printing method being used. If you’re new to professional printing, our giclee fine art prints page explains how giclée printing works and how image size and borders affect your final print.
The size you choose on the product page is the image size (printed artwork area).
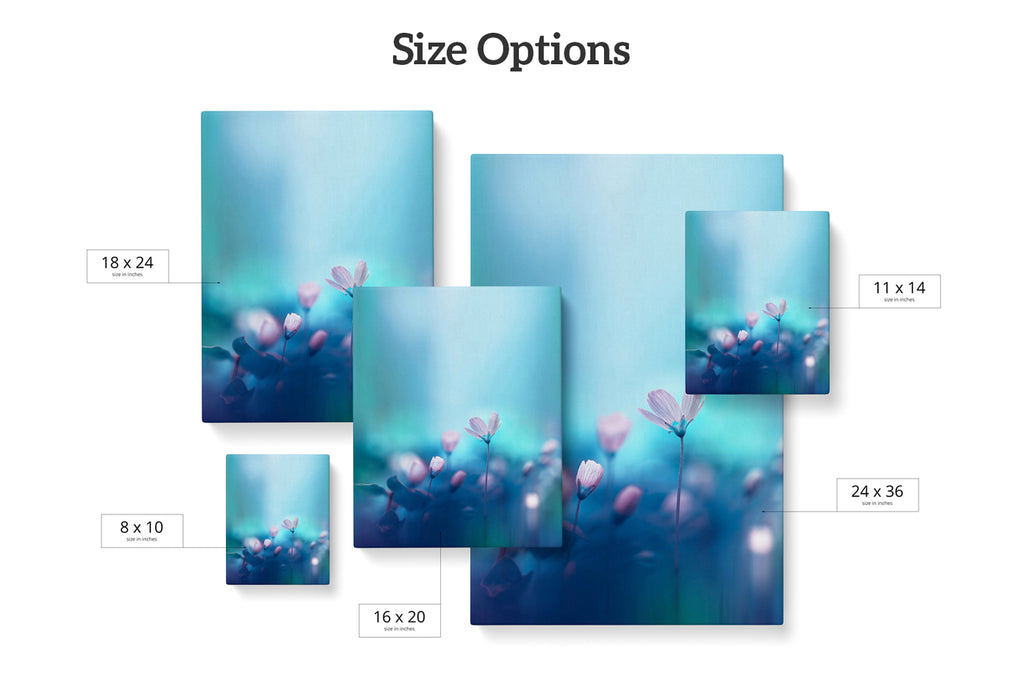
- Artwork scale: Larger image sizes preserve fine detail in complex work.
- Display context: Wall size, viewing distance, and room scale matter.
- Usage: Gifts and albums work well at smaller sizes. Gallery displays benefit from larger formats.
- Shipping considerations: Smaller final sizes are easier and safer to ship.
File resolution and maximum image size
The maximum printable image size depends on your file’s pixel dimensions after cropping.
As a general rule:
Divide the pixel dimensions by 150 to estimate the largest recommended image size in inches
- Best: 300ppi
- Good: 200ppi
- Minimum recommended 150ppi
Example: 3600 × 2400 pixels → approximately 24 × 16 inches
Printing larger than your file supports can result in softness or pixelation.
To confirm your file supports the image size you’re choosing, review our file preparation and resolution guide before uploading.
Common image sizes by aspect ratio (examples)
The image sizes below can be printed without cropping when matched correctly.
| 1:1 | 4:5 | 2:3 | 3:4 | 5:7 | 1:2 | 1:3 | ISO | US | Special |
|---|---|---|---|---|---|---|---|---|---|
| 4×4 | 8×10 | 4×6 | 6×8 | 5×7 | 10×20 | 10×30 | A6 | 8.5×11 | 7×10 |
| 5×5 | 16×20 | 8×12 | 12×16 | 12×24 | 12×36 | A5 | 11×17 | 11×14 |
Common mistakes we see
- Ordering borderless prints for matted frames
- Assuming all 8×10 prints match camera photos
- Ignoring the crop preview
- Choosing image size before checking aspect ratio
- Most phone/DSLR photos are not 8×10, so that size often requires cropping.
How The Stackhouse helps
We provide crop previews, multiple border options, and real human support before printing. If you’re unsure, we’d rather help you choose now than reprint later.
Frequently Asked Questions
Image size is the size of the artwork itself after you set your crop. Final size is the total paper size after any border is added. Borders are added outside the image and increase the final size.
Because borders are added outside the image area. The image size stays the same, and the border increases the paper size. Final size equals image size plus the border added to all sides.
Final size equals image size plus two times the border. For example, an 8×10 image with a 1-inch border becomes a 10×12 final size.
Cropping occurs when your file’s aspect ratio does not match the image size you select. The crop preview shows exactly what portion of the image will print.
Yes. The crop preview allows you to see and adjust how your image fits within the selected image size before placing your order.
Choose an image size that matches your file’s native aspect ratio. Most camera photos are not 8×10, so that size often requires cropping.
Measure the opening of the frame or mat, not the outer frame size. Order your image size to match that opening.
Add a border if you plan to frame the print, want matting flexibility, plan to sign the artwork, or want breathing room around the image.
Most artists choose a 1-inch or 2-inch border for signing, depending on the size of the print and how it will be framed.
We recommend 300 PPI when possible, 200 PPI is still excellent, and 150 PPI is a common minimum for larger prints viewed from a distance. The maximum image size depends on your file after cropping.
Often yes, but larger image sizes require higher resolution. Different sizes may also require different cropping or border choices.
Printing larger than your file supports can result in softness or pixelation. Always review your file resolution before choosing a large image size.